Monday, 30 November 2009

DO SOME BLOODY WORK...

As I'm not at work during the week this week I need to catch up on as much as possible, and as I'm supposed to be documenting all that on here I though I'd put a list on here. That way, when I haven't complete it you can all give me grief!

First up is the group project:

We're aiming to have all the set stuff done for Thursday so we can use Friday to do some line tests. My jobs are to do the set for the flashback in the Granny's house, which I've done, the piles of rubbish for building up the outside sets, which I want to try get done tomorrow, to design a 2D pensioner for the background characters and a few props for the granny to kick about, which i'll hopefully get done tomorrow too, but failing that Wednesday. Tonight I've been typing up out plan of action time table thing so we know what we're aiming to do as a group over the next few weeks. I also need to finish the script now that I've had some input from the guys, and it needs a little rejigging just so the ending flows a little better.

Next to do is my live brief:

I had to do a small presentation today so that my lecturer Dave knows where I'm at with everything. I had hoped to start making the maquettes this week and start making the clay models ready to cast the moulds, but it seems I need to work on the story. Dave suggests I do more stuff that can only be achieved as easily using animation, I guess, if this was for a client, as a way of justifying doing it in animation rather than live action which would be less time consuming. So I need to add a lot more to it. I did want to add more to it anyway but I was worried it might be too much, so Dave suggesting I should means I can just go for it. It's a good thing but it does mean it'll slow me down a little reworking it and redoing story boards. I also wanted to get more of my character designs down this week, so maybe I'll do all that on Thursday if I manage to get all the group stuff done according to plan.

SOOOOO...

Tuesday:       Outdoors Sets for Group project
                       Editing Script
                       Props - rubbish and granny's trolley
                       2D Pensioner
                 
Wednesday: Completing any work from Tuesday 
                       Make a start on the next tasks if possible...

Thursday:     Rework story for live brief
                       Rework story boards, draw up plan of layout.
                       Character Designs finalized 

Friday:          Line test in group
                       Wire armatures for maquettes.

Well, I'm not so sure how well all that will go but here's hoping! Will try and post stuff as I do it so I can see what I have actually managed to get done.

Sunday, 29 November 2009

*yaaawwwwnnnnn*

Man I'm glad this week is over 'cause I am POOPED! have been working all weekend, but managed to get a little work done, but not a lot unfortunately. One thing I almost managed to finish is the background for the group animation I'm doing with Sam, Katie and Karl. It's the background for Granny's house in the flashback scene. Still have the cupboard handles to do though, and a lot more other scenes! 

Thursday, 19 November 2009

live brief...

So these are two of the characters for my Live Brief which is for E4. These are pretty rushed (especially the colouring) because I needed something for my presentation, but they kinda show what i'm going for; something simple as they'll be made into 3D puppets.

I was going to make one cast to make all of the puppets from silicone, but it's going to be better to make two; one male, one female. I could have added padding to alter the shape of the figure, but I don't want them to be the same height, plus the feet will be an issue, but i'm going to have to address that when it's not silly o'clock. I need to work out properly how they're going to be made as the heads will be made from polymer clay, and something needs to be done with the feet when it comes to creating the tie-downs because silicone doesn't like you gluing stuff to it!

PIXALLLLLATION

At college the other morning we were split into 3 groups and given a camera and a computer with frame thief on and told to create a short piece using pixelation - stop motion using people.

Straight away my group (Sam, Sophie, Charlotte and Gary) started brainstorming what props we could use. Gary's suggestion that we used the bin lead to a brief idea for the storyline which we worked out the basics for then, after assigning roles, we got stuck in with the animating! Charlotte worked the camera and captured the images, Sam and Sophie were the "puppets" and me and Gary animated the inanimate objects! though by the end it all crossed over and I did a little camera work too, using the zoom and moving it whilst Charlotte captured the image.

Working together was great, especially as, with the exception of Sam, I was working with people I hadn't worked with before, but we all got on great, put our ideas forward and took everyone else's ideas on board.


Wednesday, 18 November 2009

This crazy woman is the inspiration for my tiny knitting, though hers is even SMALLLLER than mine...

Monday, 9 November 2009

I was killing some time on youtube and I came across this animation. It's so super cute and really simple I'd love to do something like this in my spare time if I had the room and the equipment!

Haven't watched any of her other stuff but I plan to.

One of my fellow Boreal Artists posted a link to a website for Clay Illustrator Irma Gruenholz.
Her work is totally amazing, and super inspiring. She creates scenes from clay characters and photographs them for use in illustration.

http://www.deplastilina.com/info.html


I really love the style of her work, it's so clean, and the 3D element gives it an edge. I think I might give it a go myself sometime. I wish I'd come across this when designing my 3D model!

Hurrah...

I've finally finished my model!

I'm pretty pleased with the final result. SO much time and effort went into making it, I feel quite proud :D AND she stands up by herself! bonus!

I did a quick line-test to try her out and using the interchangeable mouths is pretty easy and works quite well. The line test isn't great as it was a rushed job, she's supposed to be sneezing and then wiping her hand on her skirt but it just looks like she has a crazy hand. I only used the tie-down in one foot too so she swiveled around a lot when I was animating. If I hadn't been rushing to get it done I would have taken more care. I will upload it when I get the chance, it doesn't seem to want to work at the moment.


Sunday, 8 November 2009

its the final countdown, dun nur nur nurrr, dun nur nur-nur nurrrr...

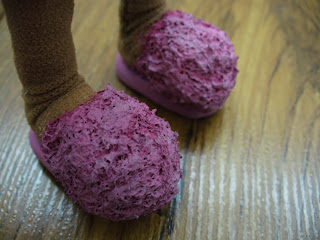
Have painted the slippers now, yey, but it took a few layers of paint. I painted them with a dark pink first then dry brushed them with a lighter colour but they were a little too bright and pink, so I pretty much repainted it with the lighter pink then made a mucky greyish pink to dry brush them again. This is how I plan to make her dead pet cat too, so that the fur looks all matted!


Her hands have been knocked about a bit so they needed a touch up. When I painted them first time round I painted them with the paint as it came, and it was a bit too dark and orange. This time I mixed it with a bit of white so the colour is a closer match to her face. Then I dipped them in latex again (I did start brushing it on but it was pulling the paint off), then I brushed over a little talc to get rid of the super glossy finish.

I've glued all the details on now too, her earrings, broach and glasses, using super glue. I also touched up her face a bit where paint had been knocked off during the making process and tidied up a few raggidy ends with some hairspray (not too much though, I don't want her looking too neat and well groomed).


Taaa daaaaaaaa.... just a few stains to paint on her clothes, and I'm fiddling about with a collar for the back of her neck to cover some of the mess up, but depends if it works or not.


Saturday, 7 November 2009

So, this is where I'm up to now...

... I've finally finished knitting her jumper. Sewing it on was a little fiddly round the neck area but it turned out pretty well. I also made a small collar which is sewn on top of the jumper. Her face needs a touch up as I've knocked it a few times when I've been sewing and chipped the paint, and her hands too, these need a little more paint and a layer of latex to tidy them up.


Next step was to make all the accessories and face parts. I was most worried about how her glasses would come out but they worked pretty well. I made them by drawing out the shape on some paper and cutting it out to use as a guideline. I rolled some polymer clay so that it was very thin and then cut out the shape of the glasses. Then I used some purple coloured polymer clay and rolled a long thin sausage shape then used this to make the frames. The mouths were made my rolling the shape I wanted and then using a tool to add the detail to make the shapes of the lips. I also made the eyebrows and jewelry using polymer clay.

 
Next I made the bottoms of the slippers. I made a template by drawing around the models feet and again rolling polymer clay and cutting it out, then I pushed a nut into the clay, this will be used when bolting the character to the set floor when animating.


Below are the finished pieces painted up; glasses, interchangeable mouths, eyebrows, broach, earrings and slipper soles. The mouths were painted with acrylic, as were the eyebrows. Pearl paint was used to paint the earrings and add a highlight to the broach. The pupils on the glasses are made from plasticine and so can be moved around when animating and the frame part was painted with white acrylic paint.


And this is what i'm doing right now; the slippers. I sewed the tights to the model around the edge of the foot and then cut the tights off the sole of the foot (so that the super glue would be attached to the armature rather than just the fabric) and attached the soles of the slippers to the bottom of the feet with super glue. I then brushed the top with latex and left to dry a little until tacky to touch. Next added wadding to the top of the foot and covered it with latex. When this is dry I'll paint it with acrylic paint and add highlights then brush on another layer of latex to seal it all.


sew sew sew...

I'm not the greatest seamstress in the world and sewing teeny tiny clothes is pretty difficult. The skirt wasn't too bad as i could sew it inside out and turn it the right was so the seam was neatly hidden on the inside, dye the skirt in some watered down fabric paint (this was more economic than buying a fabric dye and made it easier to mix my own colour) and then put the skirt on her. 

The sleeves were a lot more difficult as I wanted the seam to be hidden to make them as neat as possible. I had a practice run using some very thin elastic (as thin as cotton thread) to see if it had enough give in it for me to sew the sleeves and then stretch them over her hands, but it wouldn't stretch enough before it snapped. In the end I dyed the fabric before making the sleeves, sewed the cuff detail onto the edge of a rectangular piece of fabric and folded over an edge to create the seam. I then wrapped this round the arm and sewed the folded edge to the underlapping material. does than make sense? probably not! but anyway... voila!...


On the photo below you can also see the tights. These were made using actual tights. i bought some "pop socks" from Primark and cut off the tops which are like a large hem/tube. I found the inside of this tube had a better fabric pattern so i put the tubes of fabric on her legs, pinned them in order to take them in, and sewed them with invisible thread (it's not really invisible unfortunately, it's just clear nylon) then turned them inside out. I kept them long to that i could make them gathered at the bottom... old granny stylee...


Hair...

My model is very nearly finished now so time to catch up on the process before I add the final bits....

After I painted the face I started adding the hair. The hair is embroidery thread which I added strand by strand. I painted PVA glue on the model then added the thread to that carefully and gently moved it into place with a modelling tool. Although it was very fiddly and time consuming I did it this way as I didn't want to paste the thread on and paint over the top of the thread with glue as it would have dried plastic-like and shiney.


Below is the head after being fully covered in the embroidery thread. If I have time I plan to add more thread to the hair, this time thinner strands, in a purple-grey colour thread to give it more detail and make it look more like my original design.


Tuesday, 3 November 2009

Tiny-tastic...

I'm hoping to knit the jumper for my model, but as wool will be too big, the only suitable thing i could find is embroidery thread and 2mm needles, which is super annoying to knit with! as you knit the thread unravels to I end up missing strands and picking up strands where I shouldn't.

Here's my practice run from last week, took like half an hour just to achieve that 'cause it's so fiddly and tiny, as you can probably gather from the size of the keyboard! But if i get time it'll be worth it... hopefully.

Handy work...

Progress on the model has been slow over the last few days but today I did some work on the hands. First I tidied up the wadding with some more cotton thread. I want to make them as smooth as a can so that when I dip them in latex I get a better finish. I went over them again, this time with embroidery thread (as I wanted to use something thicker than normal thread) to fill the gaps in the wire where it had been twisted. Finally (although I forgot to take a photo of it) I went over them with some very thin ribbon so try make the surface even smoother.


I dipped the hands in latex the dried under the hand dryer to speed up the process. I did this 3 times. One of the hands will be curled into a fist so I'm not too fussed about the fingers, but for the other hand the finger sizes were a bit squiffy, so I added tips to the fingers using plasticine, then dipped them again, just the fingers this time, two more times (no photo yet though).

The next step is to add a layer of paint in a flesh tone then dip the hands again in latex, adding a thin layer to seal the paint in. I have chosen to colour the hands this way as adding dye to the latex can be tricky when trying to achieve a certain colour, and painting over the latex might mean the paint will crack when the latex bends and stretches. As the latex is shiny (and obvously human hands aren't) i'm going to try dusting them with face powder to take the shine off it. Using face powder rather than talc will mean I should be able to keep the flesh tone.


Monday, 2 November 2009

Model Boards Take 2...

I fixed the problems with my boards, two of them haven't really changed a lot so there's not much point in posting them again as it was just a bit of tweaking; I changed the font colour and coloured in a few bits I'd missed out by accident.

Here's the expressions sheet as that changed the most. I'd have liked to squeeze in a photoframe with a wedding photo of the character and her late husband but I don't really have room, or the time to draw it! If I'd had more time I'd have liked to play with the frames in photoshop to make them look more cartoony to fit in with my style of drawing, I might still go back and do that if I have some spare time at the end.

Model Sheets...

These probably should have went up before all the images of my model making, but ho hum.

There's a lot of things wrong with them that I need to change before I had them in this friday. The font is too hard to read on the boards because of the colour so I think I might change it to a lighter colour, maybe a really pale lilac so that it's still in-keeping with the colour scheme. I also missed out the hair texture on her eyebrows on some of the images.

As is was such a rush job to get it done for the last hand in the expressions sheet was thrown together and looks rubbish because the top of her hair has been cut off. To rectify this without wasting too much time I'm going to draw up a picture frame, maybe 2 or 3 different styles depending on time, and drop those over them.

I also want to add something to the Dynamics sheet as it looks a little bare, so might try to create a few more props.

Elevations

Dynamics

Expressions


Sunday, 1 November 2009

More Wallets...

I had a pretty busy weekend but JUST managed to do my other two wallet designs for Boreal tonight as they needed to be sent off tomorrow! *phew* so here they are, hopefully they'll be up on the website soon. They said they'd send me one for my portfolio but i'm not sure which one to get.

outside

inside

outside

inside