Wednesday 17 November 2010

2 posts within a week!? surely not!...

I finally had some time to myself this weekend! Hurrah! As i'd updated my laptop, and in the process lost my desktop image, I decided to draw a new one.
Obviously it was going to be something with tentacles.
LO AND BEHOLD!

I prefer to draw stuff by hand but the lack of a scanner at the moment is forcing me to draw straight into photoshop using my tablet, but I'm getting a little better with it, though I still find it difficult to draw smooth curves. I drew him out roughly and then played around with colours. I really wanted to make him turquoise, but every time I draw a squid or octopus (or make a giant one!) it's turquoise, so I decided to try a different colour for once!...


I built him up in layers just using blocks of flat solid colour, a pinky red colour for his main body and a peachy colour for the underside of his tentacles...


Next step was to add shading by adding lighter areas to the octopus. This is kind of the backwards way of doing it but it's just laziness as I just used the same paths that I'd used to create the main shape and just moved them around a bit and shrunk them down...


Once I was relatively happy with the shading I added his eye, I did this in the same way, building it up layer upon layer...


I don't know what I'm going to to with the background, I don't like having too much detail, so I just added a turquoise colour (I had to get it in somewhere) with a gradient on it. I might play around with some textures, maybe something like the ones I used on my final show photos/drawings. 

So this is where I'm at now, I've started drawing on some suckers which I'll probably just colour free hand rather than using paths.. 'cause it's easier... I'm not sure whether I should put something else on there with him too, I like to have clear space on my desktop for files and stuff, so we'll see...

Thursday 11 November 2010

POW!

Well, once again it's been a while since I updated! I will try and keep on top of things now that I'm getting used to my new routine! It's my fourth week at my new job this week (it's flown over!) and I've been pretty busy so haven't really had time to do anything creative for myself, let alone post it on here!

The new job is going ok though, I've still got a LOT to learn about the company, I haven't a clue what people are talking about at times, but I feel like I'm doing a lot of work and I'm even learning a few new PS tricks as I go! It's even prompted me to use twitter a bit more! 

Today I got to go to CAT (link below), there are a lot of people out of the office this week doing important things in other countries so I get the impression I was a last resort so as not to waste the ticket, and to be honest I was expecting to be sat there not having a clue what was going on and not understanding what anyone was talking about, but it was a great day with some awesome speakers and some mega interesting stuff so I'm chuffed I got to go, last resort or not!
http://creativitycat.com/index.php

The highlights of the day:

Stewart Smith - http://stewd.io/ - you should definitely check out his website, full of fun things he's created, he did a great video for Grandaddy which is on there too.

Chris Milk - http://chrismilk.sites.livebooks.com/ - this guy is genius, if you've seen the interactive Arcade Fire video then this is the guy responsible for it. If not then go here now... http://www.thewildernessdowntown.com/ 
Unfortunately it's a little limited when inputting your town, I opted for London (no Newcastle or Durham on there unsurprisingly), but the idea is amazing. 
He's also the guy responsible for this http://www.thejohnnycashproject.com/ which again is total genius, and although each frame is done by a different person, I love the idea of doing a rotoscope animation and using different media for each frame. *rubs chin*

As well as those guys there were a bunch of other cool folk there such as Iain Tate from Wieden+Kennedy (responsible for the Old Spice - The man your man could smell like ads! If you haven't seen them... where the hell have you been!? get yourself onto youtube and have a look, check out the twitter responses they filmed too) and Tommy Pallotta (producer of A Scanner Darkly) who talked about his new project http://www.collapsus.com/ which is a mixture of documentary, drama and gaming and looks pretty ace. There was a whole bunch of other cool things and interesting people too but I won't go on.

ANYWAY, it's pretty late and I have work tomorrow and I've rambled on enough for now. 
Here's an octopus with a monocle drinking brandy which I drew whilst watching Day of the Dead...

TTFN!

Saturday 25 September 2010

news news news...

Man it's been a while since I updated, been pretty busy with work and the bands stuff, and to top it all off I got myself a new job. A real, proper, grown-up-persons job! So now I have to start acting more like an adult... ish. The job is in London too so that means I'll also be relocating! Hopefully I'll manage to find time to do the odd creative thing in my spare time to update ye olde blog, but until then I have the bands video to finish so I'm sure I'll have lots to post!

You should all check out this animation too as it's pretty freaking awesome, and was filmed on the new nokia N8 using a Cellscope...


Equally as awesome is this, so you can see just how small Dot is! ENJOY!...

Friday 20 August 2010

More band progress...

As I was off ill last week I tried to catch up on some of the work for the bands video, it's coming to the end of the fiddly bits now, but I still have a massive amount of stuff to do and I'm fast running out of time to do it! :s

I decided to have a go at using the silicone solution I'd used to patch up the sailor boys hands, which was a mixture of clear bathroom silicone, white spirit to thin it down and oil paint to colour it. I started by filling the hole in the middle of the hand with some silicone and brushing some over the fingers to try and fill some of the gaps in the wire...


Once this had dried I mixed up the solution with the oil paint...


This was really difficult to work with, as you brush it on it picks up on any little bits and leaves a really messy finish. Brushing on a layer at a time was talking forever, and when I would put a thick layer on to try and fill in the gaps between the twisted wire on the fingers, once it had dried it would shrink a little so still looked messy. This wasn't how I wanted the hands to look, I was hoping for a much neater finish and it was taking forever, so I decided to abandon this idea...


Luckily my lovely friend Alex had recently moved house and during the move came across some liquid latex which she kindly donated to me! I forgot I had it but thought that it would be worth a shot and it's something I had used before so I had a better idea of the problems I might encounter. I stripped off the silicone from the fingers, leaving the silicone in the middle of the hand to plug the hole in the wire, and started dipping the hands in the latex. Straight away I had a much better finish. When I made the granny model I wrapped the fingers to try and smooth them out so that I could get a smooth finish, but this made them difficult to bend. This time there was nothing on the wire, but the latex fills the gaps easily and builds up quickly, it can be dried with a hairdryer to the point where it's ready to be dipped again in a few minutes making it a much quicker process too. 
Once the hand was starting to get built up I waited until the latex had dried thoroughly and then painted the hands with acrylic paint. Once the paint was dry I dipped the hands again a few more times in latex to seal the paint...


I'm a lot happier with this finish than I was with the silicone. I think this is about as good as the hands could get without managing to make a great mould and casting them in silicone... which didn't work so well the last time I tried! 

So that's the bodies up to date, next the heads...

To create the lion masks on the two main characters I built the shape up bit by bit. Having already created the shape around the face of the character I added to this creating the lower part of the face; the mouth and below the nose, then put it in the oven to harden...


Once cooled I started to add to the top part of the lion head, creating the length of the nose and the brow...


The band were ready to paint. I first painted them with acrylic paint but the finish was awful! So, annoyingly, I had to peel it all off and start again, it was difficult to remove in some corners though which were left a little messy looking. I started again using a very watered down acrylic paint and built it up in about 7 or 8 layers, allowing it to dry between each coat...


I painted the faces of the two main characters the same way and painted the lion masks using a very watered down acrylic paint and again building it up very slowly layer by layer, and painted the hair on the bands models...


Once all the paint was dry I started to add some detail. For the lions masks I added some shading in a darker tone to the arches of the brows, painted on a brown lip line around the mouths and painted in the nose etc. For the band I painted the hair a flat colour and then dry brushed over it using a lighter tone.
Next step will be to paint some patterns onto the lion masks and add the eyes and then start glueing on the mane, add some rosy cheeks to the girl character, and possibly make some teeth for the lion mouths to glue on. I also want to paint more detail onto the bands hair, particularly the one on the right as there wasn't enough texture for the dry brushing. There are a few bits that need tidied up too around the hairlines and the mouths of the lion masks, just to give them a tidier finish...


I've also started cutting out the patterns for the trousers for the 4 male characters and they SHOULD be pretty straight forward, it's the shirts etc that will cause the issues. Also a change in the way I've built the models means that I can't have the female in a dress now as her arms and legs will need to be covered so I need to come up with a new design for her outfit :( ho hum, I'm sure I'll come up with something!

Monday 16 August 2010

Little shop of horrors...


I started this picture when I was down in London a couple of months ago, but once I got back it was a little neglected... well, a lot neglected... I hadn't so much as looked at it. I've been ill the last few days so decided to work on it a little.

I wasn't happy with the male character so I decided to redraw him, fortunately I started by redoing his head and once I was a bit happier with that I kept the body as it was, so this is how he looked before hand...


...and here he is after I redrew his head...


I coloured him the same way as I had coloured the female character, using very flat colour and simple shading... 


Once I had finished with him I roughly coloured the background outside of the shop door, this was then drawn up a lot neater and I'll probably turn the opacity down on the layer a little later on...


So this is how it looks at the moment, Still lots to add to it though; more roots and tentacles, leaves, cracks etc on the wall, and I think I might play around with a texture once I'm finished... if I ever finish it!


Friday 30 July 2010

Progress Update Part 2...

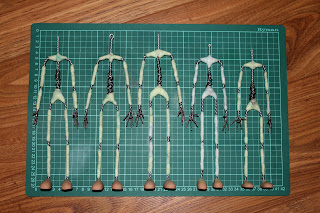
So the next update is a little one about the armatures for the bands video. I had originally planned to cast the armatures in silicone, so they which were fleshed out with plasticine to create a mould, but things went very wrong (see previous posts for rants!).

So I decided to use the same sort of techniques I used for Granny, which was to flesh the models out using wadding and wool. Turns out this technique has it's benefits, mainly the fact that the models are a lot lighter and so should hold their position better when animating. It also meant I could play with the shape more, adding bits and taking bits away, which would have been more difficult if casting the models.

The first job was to strip off aaalllllll the plasticine, which was quite fun but very messy! Then the boring bit, scrubbing each armature with warm soapy water and a toothbrush! I wanted to get as much of the plasticine off as I could and it was all stuck inbetween the twisted wire. Nightmare. 

But I got there eventually and returned to square one...


I'm not going to go into loads of detail about how I fleshed them out, it's pretty easy to figure out. It was just a case of adding clumps of wadding and neatly wrapping wool around them, making sure it was quite tightly packed so it wouldn't lose shape. I wasn't too worried about the arms being thinner than they needed to be as it will give me more room when it comes to sewing on the sleeves and trouser legs, I did pay more attention to the torso though...


So, a bit of a lazy post, but here are the models all padded out...


I had wound thread around the fingers to try and smooth them out ready to coat in a silicone solution, but I decided to remove it and try and fill the gaps with the silicone as when I would thread around Granny's fingers it restricted how easily the wire could bend.

Progress Update Part 1...

Over my days off this week I decided to give myself the task of finishing all the sculpting for the heads for the bands video so that they were at a stage where they could be painted.
Turns out it was a lot more work than I first thought, though I did pretty much finish the bands heads on day one, leaving only a little to finish on day two and the lion masks to do on the lead characters heads.

I had already created the basic shape of the bands heads and added the nose and ears to each so the last bit to do was the hair. I started by adding a basic hairline for me to add onto...


Once this was done and I had baked it in the oven I started to add onto the shape of the hair bit by bit. This proved to be the time consuming part; trying to shape little pieces on such a small scale. I started with Paul's head first (below, centre), his hair was a little simpler as the back would stay plain and the front was kind of sticking up in a sort of quiff, trying to do the very thin pieces was very fiddly though. Next up was Rob's head (below, right), I had drawn his hair a little more messed up so I wanted to have bits flicking out here and there, the back wasn't plain either, it has little sections of hair to add a bit more texture to it. Last but not least was Jamie's head (below, left), I had drawn Jamie's hair a little messy and sticking up but pushed to one side, I tried to create this using tiny, thin, rolled pieces of clay, but at the last minute before baking I wussed out and knocked all the ends down as I was worried that they would be too brittle and would break off. So here's how they looked after baking...


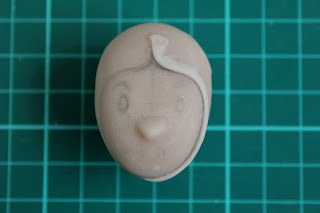
So the next job on the list for day two was to start on the lion heads on the two main characters. Again I had already made the basic head shapes and had added the noses. To add the lion headpieces I drew the eyes onto the heads using a pencil to work out where the headpiece could fit around the features and then drew the line for the edge of it. I then rolled a long piece of sculpey and followed the line on the head, blending it as I went...


I continued all the way around the face and then using a wooden tool I tidied the edges around the face. I used the sharpest edge of the tool to make sure I pushed the blended clay under the edge of the mask piece around the face so that it would look like the face was inside the headpiece...


The next step was to build up the clay behind this edge so I added another thinly rolled piece of clay all the way around and blended it in...


The next step is to continue adding to the shape of the head and eventually shape the nose and face of the lion to which all the pieces of fabric will be added to create the mane.

Saturday 10 July 2010

Duct Tape Wallet

About 50 years ago (or maybe like 5 months or so ago) a friend of mine told me about Duct Tape wallets and I said I'd have a go at making him one, now I've eventually found time to do it! I found a lot of tutorials on youtube about how to make them, but the one I used to help me with this was the best one I could find as the fold in the centre was better than the others I'd seen. It was actually pretty easy to do, but required a little more patience than I thought it would to try and get the tape smooth and straight...

First I measured two lengths of duct tape measuring 9inches, then overlapped them to create one wider strip measuring 3.5inches wide. I did this twice and then placed the two sticky sides of the pieces together. I then did the same again, but made the pieces 9.5inches long, this longer piece provided the outside of the wallet, and the shorter piece is for the inside (which we'll call the front)


Next I made the pockets for holding cards. These were a little wider than a card, I made them about half an inch bigger so that it gave me room to trim them down. I kept them the width of the tape and again used two pieces stuck sticky side together for each piece. The tutorial I used made four pockets, I chose to make 6...


This shows all the pieces so far...


Next up I added a strip to the top of each card pocket, and then made a piece to attach these to, which would also form the hidden side pockets on the wallet. I made two of these pieces, one for each side, they were the same width as the large pieces for the wallet (3.5inches) and the length is 4 inches...


The next step was to tape these to the hidden pocket piece, again I altered the instructions I was following a little, I taped the card pieces to the larger piece, putting each one about a centimetre higher than the last and taped them in place...


I then added a strip on either side to tidy it up...


Once I had done this with the pieces for both sides I trimmed down the edges to tidy them up, and then put a strip along the inside taping down all the edges of the card pockets...


I then added a strip of tape across the top and bottom of the front piece, and across the top of the outside piece, with a little strip in the middle at the bottom...


The next step was to place these on top of eachother and put a strip of tape down each side, taping together the edges of the card pockets and attaching the front and back pieces together. As the outside piece and front piece are different lengths I had to line up one side and tape it, then slide the edges of the other side so they met and then tape those. The last step was to add the strips to the bottom so the money wouldn't fall out! These strips were as wide as the card pockets so that there was a hole left in the middle of the wallet, this meant that when the wallet was folded, the outside was larger than the inside and the inner piece wouldn't crease...

So that's it. Finito! 

Tuesday 6 July 2010

Business cards...

Well it's taken me a while to put these up but here's some photos of the finished cards, this is actually the last full set I have of them! But I thought there might be people who would like to see how they came out...


The reverse side of the cards all have the same picture of the deer on with my information...


I have to next week off work so I'm going to hopefully finish off the models for the bands video, and get all the sets done. I'm also working on a wedding cake topper, but I can't post that yet as we don't want to be revealing any clues as to what the brides dress looks like! I'm taking photos as I do it though so after the wedding on Saturday I'll post it up. It's proving to be a lot tricker than I thought, I'm using polymer clay as it needs to be something the bride and groom can keep afterwards, and I find that a little difficult to work with anyway, but as it's like 4 inches tall, and so pretty small, it's quite fiddly, but hopefully I'll manage to do a good enough job of it :s

Wednesday 30 June 2010

ONE HUNDRED!

Well I had hoped to post a nice finished picture for my 100th post, but it's taking ages so I thought I might as well just post my progress, it's also my last day in London today so it shows what I've done during my time here, also, once I get back I have a video to work on so not sure when I'll get this finished.

I started on Audrey first as she was the simplest character. I found that she wasn't visible against the yellow background so I changed it to a dull green colour...


Once I'd finished with Audrey I started to work on the colours I wanted to use for Audrey II and scribbled them on a separate layer so that I could keep referring back to it. The first part of the plant I drew was the plant pot, then the neck/stem and then I started on all the tentacles. One of the tentacles was drawn on a separate layer as this was the one that had hold of Audrey and so needed to be layered over the top of her....


Originally I had drawn the leaves with a raggy edge but when it came to colouring them up they looked quit messy so I redrew them with just a simple leaf shape. I also added some smaller tentacles on the walls behind the plant, and finished off the tentacle that was wrapped around Audrey's waist...


The most time consuming part so far has been Audrey II's head, but I've managed to get most of it done; the head itself, the mouth and all the teeth! It just needs the leaves around the "face"...


So here's a little snippit of it so far. Annoyingly I think I'm going to have to go back and work on Audrey because she's a little faint compared to the plant so the shading parts on her need to be darker. I think the background needs to be darker too so that the teeth on the plant stand out more, this should also make Audrey stand out a bit more...

Friday 25 June 2010

...

Well, after two years of working non-stop and spending all the pennies I have on college stuff I'm finally having a week off (hurrah!) so I'm visiting a friend in London.

Before leaving I started a new drawing. There were a few things that I had in mind that I wanted to do...

   A fully finished scene - after doing the woodland scene I thought I should have another go at doing a finished image as a lot of my stuff is just a character on a blank background.
   * Stylised and with no outline - I've done a couple of smaller images in this style before, and did two cut out animations using this style, and I rather like it so would like to work on it some more. This is the style I used on the woodland scene so I thought it would be nice to create something again using this style that had a lot more detail in, and as I wasn't working to a deadline it'd be nice to just take my time with it.
   Little Shop of Horrors - as this is one of my favourite films, I've been wanting to do some drawings from it for a long time now (and make an Audrey II puppet!) so I thought it would suit the style quite well, and it was something I could make quite detailed. 

So, I started to draw it up in my sketchbook in the hope I could finish it off, scan it and then work on it whilst I was down south... but I didn't finish it... so it didn't get scanned... and I forgot to bring the sketchbook with me. Idiot.

But fear not! for it provided me with an opportunity to do something I rarely EVER do... draw something straight into Photoshop. This always scares me a little, although I know it shouldn't, 'cause it's a lot easier to erase mistakes in photoshop, but I feel I have a lot more control over my drawing if I draw things out in pencil then scan them in and colour them/trace over them in PS.
However, it wasn't quite the disaster I thought it might be; after drawing one character, I was able to draw the second on another layer and concentrate on getting the proportions right without having to make sure it was to scale against the other character as I was able to adjust this afterwards. It also meant that I could reposition the character until I was happy with it.

So here are the first few images! 


Oh, and this is my 99th post! making the next one... ermmm... the 100th! I wanted to post something more interesting, a finished piece, for my 100th post and I had hoped it might be this finished image, but we'll see how much I get done and how long it takes!