Friday, 26 February 2010

Chris Appelhans

We had a mini research task today for PPD, to do a mini presentation on our favourite artist/ animator...

I didn't have to give it any thought, I went for Chris Appelhans. I love the style of his work and his use of colours and light. his work is always a little dark, which I think I like because apparently my work always has a morbid side to it despite looking cute at first glance.

I first discovered him at uni, some time in 2003/2004 when a friend of mine showed me a short animatic he'd done about superman, and I've used him in my research for pretty much every project I do.

I can't find a lot of information about him, he doesn't seem to be that old, but has done concept art and character design for a lot of big films like Coraline, Fantastic Mr Fox, and, one of my favourites, Monster House.

Being a big fan of Alice in Wonderland I'm also a massive fan of the Alice in the Underworld images he did.

I'd recommend checking him out, he has some awesome stuff in his Doodles page, including this image which is one of my favourites...

http://www.froghatstudios.com 

Thursday, 25 February 2010

Alice's Head...

To make the head for Alice I started with a ball of tin foil, this reduces the amount of polymer clay I'd use and makes the head lighter so that the model won't be too top heavy. To make the foil ball as compact as possible I rolled it on the cutting mat, putting all of my weight on it and made it a little smaller than the size I wanted the head to be to account for the layers of polymer clay...


Next I added a layer of polymer clay to the foil ball. It proved to be quite difficult to shape the clay as whilst shaping one side i'd squish the side that I was holding, so I covered it with a thin layer, just as a starting point and dried it out in the oven...

Once that had cooled (and it looked a bit like an egg) I started adding shaping and detail bit by bit, and baking it after each addition. First I added to the side of the face to widen it and create the shape I wanted, then baked it. Once that had cooled I added more clay to the chin to make it a little more pointed, and added the ears by rolling a ball, flattening it and then cutting it in half and sticking it to the sides of the head and blending the edges in, then I used the sharp end of my modeling tool to add detail, giving the ear more shape...


The size of the head was including the thickness of the layer of hair, so I didn't want to add too much more clay when creating the hair shape. I added clay to the back of the head to make it more rounded for when I covered it with the hair. For the fringe I rolled two long thin pieces of clay and placed them where I wanted the edge of the fringe to be, then blended the inside edge in...


Next, i added a very thin layer of clay next to the first part of the fringe, and blended it up and into the shape of the head, then, once again baked it all...


All this adding-a-bit-and-baking-it-malarkey was very time consuming, but the last time I used super sculpey I managed to burn it very easily, so as well as this method making it easier for me to mould, it meant I was able to dry out very thin sections at a time and keep a close eye on it, ensuring that I didn't burn it! though this did mean I was actually sitting in front of the oven, setting the timer for a minute at a time!

This image shows the head from the side where I have rounded out the back of the head...


Next I added the nose. The eyes in the photo aren't the final eyes, these were just a guide for the positioning of the nose, which was once again added, shaped and blended using a modelling tool...


This morning I removed the temporary eyes and added neater ones and then baked this in the oven. the mouth and brows will be added in Photoshop once it has been photographed.

The next step is to give it a little sand, just to tidy up any messy areas where I've been blending, like in front of the ears, which you can see on the photo above, just to give it a smoother finish, then it can be painted and the rosy cheeks added, then i'll start gluing the hair on.

Take Two...

So yesterday I started again with the Alice mould, I was going to make it with plaster but my lecturer, Dave, thought it would work better using RTV silicone, it also meant it was another model making material I can say i've experimented with.

It's pretty scary stuff, the catalyst is pretty poisonous, so you have to be super careful with getting it on your hands and touching food etc.
It's made with 1 part catalyst for every 20 parts silicone. We mixed it a cup at a time, using two cup-fulls to create a bed in the bottom of the mould. I hadn't mixed the second cup thoroughly enough so the bits from the bottom of the cup were still a bit sticky when the rest of the mould was set, so it had to be left over night...


The Silicone and catalyst were weighed on digital scales to ensure we used the right amounts...


Once poured into the mould box the silicone levels itself out really well, unlike the vinamold! Air bubbles rise to the surface and pop, but I helped speed that along by popping them with a craft knife....


Having left the base layer to set fully over night, today we continued with creating the bottom half of the mould, it took a lot more silicone this time. First we poured in a layer of silicone to lie the model in, then once it had settled in, poured another cup of silicone in, close to the model, allowing it to level itself out, then any bubbles were popped with a craft knife again...


We added a third cup of silicone, bringing the surface level up to the halfway point along the side of the model. In order to make sure the two parts of the mould line up we pushed pencils into the wet silicone, these were pushed through some foam board to hold them in place whilst the silicone sets. The ends were sprayed with a release agent to ensure that the two parts of the mold will come apart and wont be held together by the pencils....


Hopefully tomorrow the silicone will be set. The next stage will be to use PVA to coat the surface of the silicone and once that has dried the next layer of silicone can be added to create the second part of the mould... though it has just occurred to me that Dave is otherwise engaged tomorrow and I don't know where the silicone is. eeek. so hopefully i'll manage to find it!

With any luck i'll manage to track it down and finish the mould, then on monday, having let it set over the weekend, the model can be removed, the plasticine stripped off, and the armature placed back in the mould which will then be filled with silicone. fingers crossed!

Tuesday, 23 February 2010

Oh Dear...

Well, project Vinamold-Mould have been abandoned.

It started well (see previous post) but soon took a turn for the worst. 

I got to the stage where I needed to place the model in the mould, no problems there... melted some more vinamold... slight problem with only being able to melt small quantities at a time there. 
Pouring the vinamold to flood the model provided to be a little trickier than expected, maybe i hadn't heated it enough (for fear of burning it and rendering it useless) but as the liquid rolls, it cools, and as a result it wouldn't level out and fill the gaps, it just set on the top, exactly as i had poured it. none of that shaking malarkey to level it out either, nope siree, that didn't work either. I was also hugely concerned that the fact that the vinamold wasn't flowing as easily as i had hoped, resulting a lot of gaps underneath, meaning the mould wouldn't work, but this was something i'd have to check after i'd finished and took the plasticine model out...


So i continued to melt down small amounts in the hope i could just fill the gaps, and trim any mess with a craft knife as it's pretty easy to slice. This meant pouring the melted vinamold as close to the edges of the model as possible, and meant i still couldn't get a level finish which i needed so that when i made the second part of the mold they wouldn't fix together and could be easily separated...


I tried to trim a few bits off and found that the layers came away easily... very easily... TOO easily... none of the layers had bonded to each other. Faced with a 'laugh or cry' situation, i fortunately managed to see the funny side of it... partly because the vinamold peeled away from my model easily, and partly because peeling it off was so satisfying!...

Little Alice managed to remain pretty much in tact! She had a few minor bumps and scrapes but nothing that couldn't be easily fixed, the box for the mould also survived, and the vinamold can be melted down again, so it wasn't a total loss!


These are some parts from the mould which revealed that i was right to worry about there being gaps in the mould, it had done exactly what i though it had. I've roughly drawn on where the model was positioned so that it makes more sense what it is i'm showing! The first photo is from the neck and shoulders, and the second from one of the hands...


Sooooo... plan of action... 

off to college early tomorrow, to use the box i saved and make a plaster mould! same technique pretty much, but quicker and a lot more tried and tested! I should also get the silicone into the mould tomorrow too, which means i shouldn't really lose much time as the plan was to do the silicone with this mould tomorrow anyway! so fingers crossed!

I've also made a start on the head, but i'll wait until i have more photos to document the process on that!

Monday, 22 February 2010

Alice Model Progress...

Since last week I've fleshed out the armature with plasticine using the drawing of alice as a template...

Next is a close up of the foot to show the plasticine and how it is shaped to fit the shape of the shoe, when the mould is made and the model is cast in silicone, the silicone should fill where the plasticine currently is so that the seam where the feet are attached should be disguised...


The photo below shows the armature once I'd finished covering it in plasticine, though it still needs a little work to smooth out the surface more before making the mould...


I made a box for the mould using cardboard and lining it with parcel tape. I drew around the model and made it shaped around the model rather than square as this will reduce the amount of vinamold I need to use...


The top of the neck will be sticking out of the mould as mentioned in a previous post, this will mean I can trim off excess silicone to make it fit snugly against the head when I glue it on, this will also leave a hole into which the silicone will be poured...


I was a little concerned about using the Vinamold as I didn't have any proper equipment to melt it. I looked online to find any other suggestions for melting but they all sounded a little unsafe, like using a chip fryer, or melting it in the microwave in 10 second bursts. It had been suggested to me to melt it in the oven, but it needs to be melted at a temperature of 140 - 150C and our oven currently doesn't have a working thermostat so the chances of burning the vinamold were pretty high, and burning the vinamold ruins it and reduces the amount of times you can reuse it. In the end I decided to just use a pan, this would allow me to keep a close eye on the vinamold and I could take is off the heat if I thought it was over heating...


The vinamold had arrived in a big slab, so I cut strips off then diced it so that the pieces were smaller and so would hopefully melt easier... it looked a bit like cheese...


I had started by using a larger pan of boiling water and placing the smaller pan over it so that I wasn't heating the pan directly but I couldn't get the vinamold hot enough, so eventually I just used the pan directly on the heat. This actually worked well, I kept a close eye on the vinamold, stirring it and adding the diced pieces a few at a time. When it melted it was a bit like the consistency of custard...


Once all the lumps had melted I poured it into the mould, this will provide a base for the model to lie on when I make the bottom half of the mould. I gave the mould a little shake to level out the vinamold. Once it had cooled and solidified I decided I wanted the base to be a little thicker, so I repeated the process and added a second layer...


Once this has cooled the next step will be to tidy up the model and try and get a smooth finish, then i'll place it on the layer of vinamold and pour more melted vinamold into the box halfway up the side of the model, then i'll brush on a layer of PVA to create a barrier before adding a 2nd, final layer of vinamold. To this layer i'll had some doweling or something similar to ensure that the pieces of the mould line up properly when I put it back together.

Once problem I have found with the vinamold is the bubbles, even when it has first been poured it's thick and removing bubbles on the surface is difficult, I tried to pop a larger one with a craft knife but this didn't work. I could only advise taking care when stirring to avoid trapping air in the mixture. I also don;t know if i had managed to burn it or not, maybe if i had burned it i'd know, but i'm not sure if it discolours or something... might be worth investing in a thermometer.

Friday, 19 February 2010

more updates...

Odd Shaped Head Music Video

This project has been going a little slow this last week or so as i've been working on the alice project to catch up after I changed from doing the E4 brief.

I've drawn up images of the band and the two main characters and worked out how the armatures will fit, and have drawn up a separate set of images to work out the clothing for each character which i'm in the process of colouring as concept art.

I've had to order more wire to make the armatures, but hopefully it'll arrive early next week so i can make the armatures for the band members, (i've already made the armatures for the two main characters), then i can make the polymer clay feet and add the polymorph like i have with the alice armature, then start fleshing them out with plasticine. Hopefully this will all be done by the end of next week! 

I also need to start working on images for the backgrounds and sets.

I met with the two of the guys from the band this week and they're pleased with everything so far. they're recording this weekend so i should have a rough copy of the track next week to start working on story boards. They're also playing a gig on the 5th of march so i;m hoping to pop along so i can get some ideas of how they move when on stage.

so for now here's one of the character designs that i've coloured...


What's next for Alice...

Over the next week i'll hopefully finish making Alice's body.

Firstly I need to flesh the armature out with plasticine to get the shape i want. this will then be used to make a mould using vinamold. The plasticine covered armature will then be removed from the mould and the plasticine stripped off before placing it back in the mould and filling it with silicone which will be coloured using oil paints. While i'm waiting for the silicone to set i'll be working out how much fabric i need and dying it the colours i want. Rather than buying large amounts of coloured fabric when i'll be using such a small amount, i bought a plain white cotton fabric which i can dye easily. I can also start working on the head during this time.

Over the next week i also plan to add to my research and start logging my development of the concept and the process of making the armature, and also working on what sort of items and images i will want to use in the final image.

Alice Armature continued...

Another photo of the polymer clay feet showing the bolts for the tie downs...


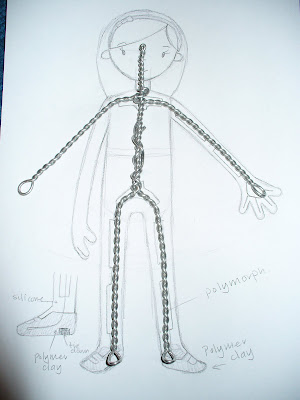
...and this is where i'm currently at. I've used polymorph to stop the armature bending in places i don't want it to. I've left the joints and the spine exposed. The neck is extra long as the head is going to be made separately from polymer clay and glued on, this is also so the silicone can cover the whole neck and then be trimmed to make sure when the head is glued into place there are no gaps where the wire is exposed.


Alice Armature...

Blogger is being a pain about uploading photos in the order I want and allowing me to move them around, so I'm having to break this up into a few posts...

This is the start of the Alice armature! hurrah! I drew Alice as I wanted her to look, her proportions etc, and drew on how the armature would fit into her body. I printed her off onto A4 the size I wanted the model to be. This acted as a guideline for making the wire armature, firstly using 2mm aluminium wire. Using one long piece rather than attaching the limbs separately gives the model more strength and reduces the risk of limbs coming loose...


Her arms worked out a little long, I tried to account for the twisting of the wire making it shorter but maybe added a little too much to it, so I wrapped the arms around the neck tightly to shorten them...


The next step was to bind it with 1mm aluminium wire and make the fingers. Again this was all done using one long piece of wire. I also added to the feet so that there was more wire to be baked into the polymer clay feet to make sure they wouldn't come off...


The polymer clay was added straight to the armature and I shaped it to make the shoes. I chose this method to make the feet as it is very difficult to glue anything to silicone, so this allowed me to bake the tie downs into the feet. Once I got the shoes to be a shape I was happy with I cut away the clay where her ankles would be and the tops of her feet would be visible. This will be fleshed out with plasticine so that when the model is cast with silicone these areas will also be silicone and there will be no joints at her ankles where the silicone meets the polymer clay...

 
Close up of the polymer clay feet...


Right, here we go...

So this is where i'm at with stuff at the moment...

Alice in Wonderland Penguin Classics Brief:

I've drawn out 10 possible layouts for the cover in rough and have narrowed the choice down to 2. 

These aren't showing up too great, i'll get some roughly coloured versions up at some point.

The top image is the concept I am currently thinking about working on, it'll use photography for capturing the model of the character and illustrator and photoshop to add detail. The idea is that it looks like a playing card, the images will show two sides to alice and the drawn detail will incorporate elements and imagery from the book. I'm not sure how the back of the book will look though.

The second image, although simple, was one of my favourites as the character was framed by the hole she was peering through and i hoped it evoked a sense of curiosity so that the reader would want to pick up the book and find out what alice was so intrigued by. The set would be created in 2D, either by using photographs of textures or creating my own images and textures in photoshop.


Thursday, 11 February 2010

Penguin books brief...

These are a few images of a rough maquette made from plasticine to get an idea of how I might want the alice character to look. Obviously i haven't really made the hair, this would most likely be done with thread which would be attached to the top of the head and left hanging.

Below is a drawing I did of how I would like the model to look, with the squished face and the eyes wide apart, but I'm not sure how well this would work as a 3D object.

*siiigh*

Things have changed since I last posted...

I'm no longer doing the E4 project as I have a lot to do for the music video, so I've decided to do the Penguin Books brief to do a cover for Alice in Wonderland, but rather than doing an illustration I've decided to make 3D models and a set and photograph it. So as a result I'm a little behind on everything, it does mean less work as i have less models to make and don't have to do a 2nd animation, but just need to catch up with everything now! 

Hopefully the next week will be spent making the armatures for the bands models, and for the Alice character, working out my composition for the alice cover and finishing off my research for both projects. By the end of next week i want to be drawing up sets for the Alice project and be ready to cast the models for the band and start working on clothes and heads.

here's a couple of rough designs for the characters in the bands video...