Blogger is being a pain about uploading photos in the order I want and allowing me to move them around, so I'm having to break this up into a few posts...
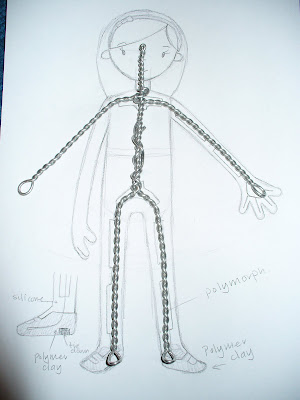
This is the start of the Alice armature! hurrah! I drew Alice as I wanted her to look, her proportions etc, and drew on how the armature would fit into her body. I printed her off onto A4 the size I wanted the model to be. This acted as a guideline for making the wire armature, firstly using 2mm aluminium wire. Using one long piece rather than attaching the limbs separately gives the model more strength and reduces the risk of limbs coming loose...

Her arms worked out a little long, I tried to account for the twisting of the wire making it shorter but maybe added a little too much to it, so I wrapped the arms around the neck tightly to shorten them...
The next step was to bind it with 1mm aluminium wire and make the fingers. Again this was all done using one long piece of wire. I also added to the feet so that there was more wire to be baked into the polymer clay feet to make sure they wouldn't come off...
The polymer clay was added straight to the armature and I shaped it to make the shoes. I chose this method to make the feet as it is very difficult to glue anything to silicone, so this allowed me to bake the tie downs into the feet. Once I got the shoes to be a shape I was happy with I cut away the clay where her ankles would be and the tops of her feet would be visible. This will be fleshed out with plasticine so that when the model is cast with silicone these areas will also be silicone and there will be no joints at her ankles where the silicone meets the polymer clay...
Close up of the polymer clay feet...


No comments:
Post a Comment