Friday, 30 July 2010

Progress Update Part 2...

So the next update is a little one about the armatures for the bands video. I had originally planned to cast the armatures in silicone, so they which were fleshed out with plasticine to create a mould, but things went very wrong (see previous posts for rants!).

So I decided to use the same sort of techniques I used for Granny, which was to flesh the models out using wadding and wool. Turns out this technique has it's benefits, mainly the fact that the models are a lot lighter and so should hold their position better when animating. It also meant I could play with the shape more, adding bits and taking bits away, which would have been more difficult if casting the models.

The first job was to strip off aaalllllll the plasticine, which was quite fun but very messy! Then the boring bit, scrubbing each armature with warm soapy water and a toothbrush! I wanted to get as much of the plasticine off as I could and it was all stuck inbetween the twisted wire. Nightmare. 

But I got there eventually and returned to square one...


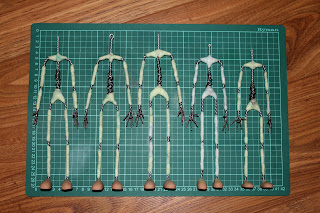
I'm not going to go into loads of detail about how I fleshed them out, it's pretty easy to figure out. It was just a case of adding clumps of wadding and neatly wrapping wool around them, making sure it was quite tightly packed so it wouldn't lose shape. I wasn't too worried about the arms being thinner than they needed to be as it will give me more room when it comes to sewing on the sleeves and trouser legs, I did pay more attention to the torso though...


So, a bit of a lazy post, but here are the models all padded out...


I had wound thread around the fingers to try and smooth them out ready to coat in a silicone solution, but I decided to remove it and try and fill the gaps with the silicone as when I would thread around Granny's fingers it restricted how easily the wire could bend.

Progress Update Part 1...

Over my days off this week I decided to give myself the task of finishing all the sculpting for the heads for the bands video so that they were at a stage where they could be painted.
Turns out it was a lot more work than I first thought, though I did pretty much finish the bands heads on day one, leaving only a little to finish on day two and the lion masks to do on the lead characters heads.

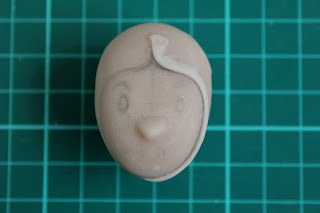
I had already created the basic shape of the bands heads and added the nose and ears to each so the last bit to do was the hair. I started by adding a basic hairline for me to add onto...


Once this was done and I had baked it in the oven I started to add onto the shape of the hair bit by bit. This proved to be the time consuming part; trying to shape little pieces on such a small scale. I started with Paul's head first (below, centre), his hair was a little simpler as the back would stay plain and the front was kind of sticking up in a sort of quiff, trying to do the very thin pieces was very fiddly though. Next up was Rob's head (below, right), I had drawn his hair a little more messed up so I wanted to have bits flicking out here and there, the back wasn't plain either, it has little sections of hair to add a bit more texture to it. Last but not least was Jamie's head (below, left), I had drawn Jamie's hair a little messy and sticking up but pushed to one side, I tried to create this using tiny, thin, rolled pieces of clay, but at the last minute before baking I wussed out and knocked all the ends down as I was worried that they would be too brittle and would break off. So here's how they looked after baking...


So the next job on the list for day two was to start on the lion heads on the two main characters. Again I had already made the basic head shapes and had added the noses. To add the lion headpieces I drew the eyes onto the heads using a pencil to work out where the headpiece could fit around the features and then drew the line for the edge of it. I then rolled a long piece of sculpey and followed the line on the head, blending it as I went...


I continued all the way around the face and then using a wooden tool I tidied the edges around the face. I used the sharpest edge of the tool to make sure I pushed the blended clay under the edge of the mask piece around the face so that it would look like the face was inside the headpiece...


The next step was to build up the clay behind this edge so I added another thinly rolled piece of clay all the way around and blended it in...


The next step is to continue adding to the shape of the head and eventually shape the nose and face of the lion to which all the pieces of fabric will be added to create the mane.

Saturday, 10 July 2010

Duct Tape Wallet

About 50 years ago (or maybe like 5 months or so ago) a friend of mine told me about Duct Tape wallets and I said I'd have a go at making him one, now I've eventually found time to do it! I found a lot of tutorials on youtube about how to make them, but the one I used to help me with this was the best one I could find as the fold in the centre was better than the others I'd seen. It was actually pretty easy to do, but required a little more patience than I thought it would to try and get the tape smooth and straight...

First I measured two lengths of duct tape measuring 9inches, then overlapped them to create one wider strip measuring 3.5inches wide. I did this twice and then placed the two sticky sides of the pieces together. I then did the same again, but made the pieces 9.5inches long, this longer piece provided the outside of the wallet, and the shorter piece is for the inside (which we'll call the front)


Next I made the pockets for holding cards. These were a little wider than a card, I made them about half an inch bigger so that it gave me room to trim them down. I kept them the width of the tape and again used two pieces stuck sticky side together for each piece. The tutorial I used made four pockets, I chose to make 6...


This shows all the pieces so far...


Next up I added a strip to the top of each card pocket, and then made a piece to attach these to, which would also form the hidden side pockets on the wallet. I made two of these pieces, one for each side, they were the same width as the large pieces for the wallet (3.5inches) and the length is 4 inches...


The next step was to tape these to the hidden pocket piece, again I altered the instructions I was following a little, I taped the card pieces to the larger piece, putting each one about a centimetre higher than the last and taped them in place...


I then added a strip on either side to tidy it up...


Once I had done this with the pieces for both sides I trimmed down the edges to tidy them up, and then put a strip along the inside taping down all the edges of the card pockets...


I then added a strip of tape across the top and bottom of the front piece, and across the top of the outside piece, with a little strip in the middle at the bottom...


The next step was to place these on top of eachother and put a strip of tape down each side, taping together the edges of the card pockets and attaching the front and back pieces together. As the outside piece and front piece are different lengths I had to line up one side and tape it, then slide the edges of the other side so they met and then tape those. The last step was to add the strips to the bottom so the money wouldn't fall out! These strips were as wide as the card pockets so that there was a hole left in the middle of the wallet, this meant that when the wallet was folded, the outside was larger than the inside and the inner piece wouldn't crease...

So that's it. Finito! 

Tuesday, 6 July 2010

Business cards...

Well it's taken me a while to put these up but here's some photos of the finished cards, this is actually the last full set I have of them! But I thought there might be people who would like to see how they came out...


The reverse side of the cards all have the same picture of the deer on with my information...


I have to next week off work so I'm going to hopefully finish off the models for the bands video, and get all the sets done. I'm also working on a wedding cake topper, but I can't post that yet as we don't want to be revealing any clues as to what the brides dress looks like! I'm taking photos as I do it though so after the wedding on Saturday I'll post it up. It's proving to be a lot tricker than I thought, I'm using polymer clay as it needs to be something the bride and groom can keep afterwards, and I find that a little difficult to work with anyway, but as it's like 4 inches tall, and so pretty small, it's quite fiddly, but hopefully I'll manage to do a good enough job of it :s